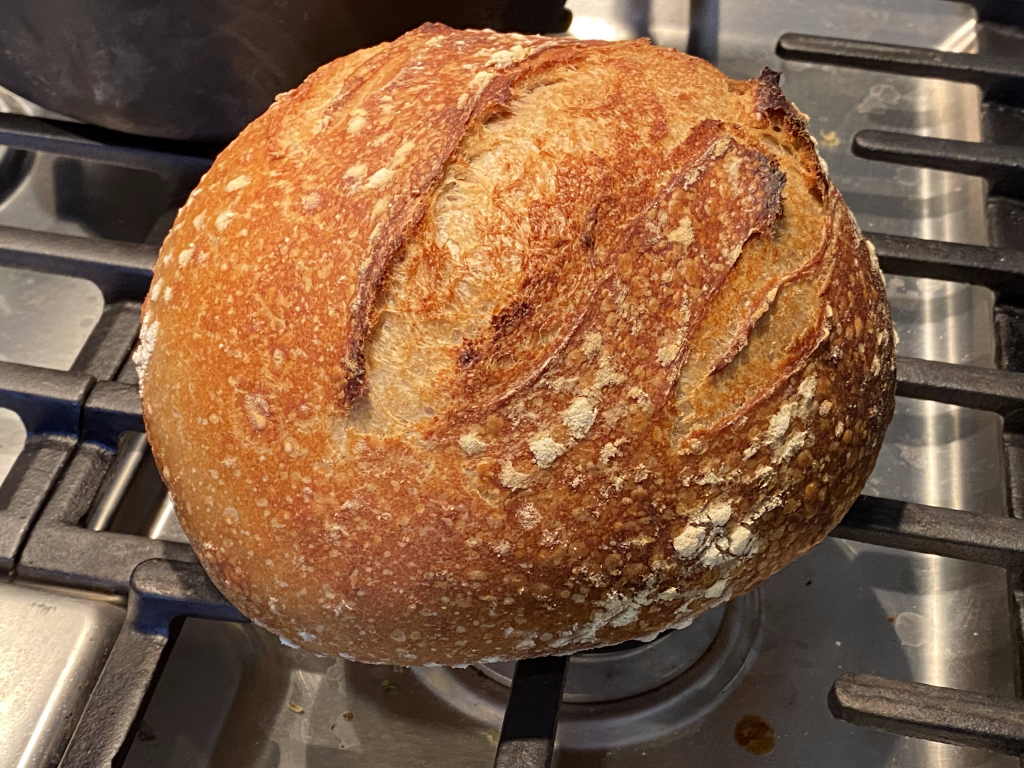
I was skeptical that I could making artisan, professional baker quality bread, until I had a chance to learn from a few pro-amateur bakers. It was surprising to learn how straightforward it is! With a few tools (most of which you probably already have in your kitchen), and a little practice with your technique, you can turn out crunchy, crusted, delicious naturally leavened loaves right from your home oven!
Does it really take 24 hours? Do I have to stay home all day?
Well, sort of. If you time it properly, I found that the time needed to be actively doing stuff (vs. wait time) is about 6 hours. That is, once your starter has been activated (best done overnight so you can work with it first thing in the morning), from making the dough until setting it up for final rise takes about 6 hours, with an activity required about every half hour. (This assumes you are doing an overnight final rise in the refrigerator. If not, and you want to bake the same day, total time is about 10 hours given a 4 hour final rise),
Equipment

- Large heavy mixing bowl
- Flat surface such as clean countertop or large cutting board
- measuring cup
- clean dish/tea towel
- spatula
- heavy dutch oven with lid or clay bread baker
- bench scrapers (straight and curved)
- digital kitchen scale
- offset bread (serrated) knife

Starter
It’s important to have an already active sourdough starter before beginning this recipe.
Flour
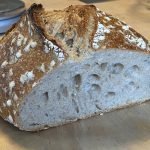
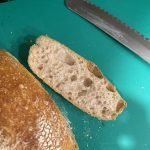
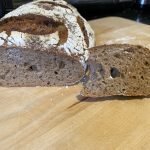
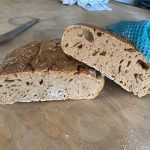
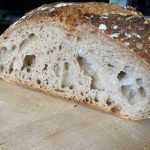
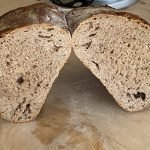
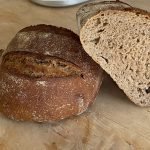
There are many volumes written about the science of sourdough and which styles of flour work best for which application. Factors such as seed variety, protein content, milling technique, whole wheat vs. flour, etc. are just some of the things that influence the bread style significantly. For purposes of getting you baking your first loaf, I will keep it simple. This recipe is a mostly (75%) all-purpose (AP) flour bread. You can use a variety of other flours like whole wheat, spelt, rye, etc. for the remaining 25%. This ratio allows the newbie to easily achieve that oh-so-satisfying oven spring (when bread rises well and has large open holes) that is the holy grail of baking sourdough.
Turns
Turns are a series of folds that you’ll do (instead of kneading). Take one side of the dough and stretch it up (being careful not to tear it), and then fold it down towards you. Give your bowl a one-third turn (120 degrees out of 360 degrees of a full circle) and repeat the stretch and fold. Turn the bowl one-third again and do a final stretch and fold. The idea is that you want your dough to aerate, so be gentle and don’t push all the bubbles out as you turn the dough.
Bulk Fermentation
See how the dough rises over the course of the day.

Artisan Sourdough Bread
Equipment
- heavy dutch oven with lid or bread baker
- digital kitchen scale
- large heavy mixing bowl
- bench or dough scraper (curved)
- serrated bread knife or lame
- Silicone spatula or Danish dough whisk
- tea ball/steeper or fine mesh strainer
Ingredients
To Activate Starter:
- 50 g (1/3 cup) sourdough starter
- 50 g (1/3 cup) all purpose flour
To Make Dough:
- 100 g (2/3 cup) active sourdough starter (from above)
- 500 g (3 1/3 cup) flour total:
- - 375 g (2 cups) all-purpose flour
- - 125 g (1 1/3 cup): whole wheat, spelt, or bread flour
- 10 g (2 tsp) salt
Instructions
Activate Starter (8 hours)
- Discard all but 3 tablespoons (50g) of starter. You can use discarded starter for other purposes.
- Mix in 50 grams of 78°F/26°C water and 50 grams all-purpose flour.
- Mix thoroughly until there aren’t any dry bits of flour.
- Cover mixture with a towel or paper towel and let it rise overnight or about 6 to 8 hours. Ideally, you are ready to start mixing dough when the starter has doubled (or more) in volume.
Mix Dough (1 hour)
- In a large heavy bowl, mix 375 ml (12.7 oz) warmed water, salt and 100 grams (2/3 cup) of active starter. (Leave enough starter to keep it going.)
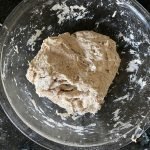
- Add the flours and mix thoroughly with spatula or dough whisk, making a "shaggy" dough. Ensure there aren’t any dry bits of flour.
- Cover bowl with dish towel and let the dough rest for 1 hour.
- At the end of the resting period, dough should look smoother as fermentation has begun.
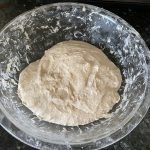
- Make two turns on the dough, then cover bowl with a dish towel or tea towel.
- To do one turn, take the side of the dough furthest away from you ("12:00" of the bowl), and gently lift it out of the bowl until it stretches, then fold it back on itself towards you ("6:00" of the bowl). Wait a few seconds. Rotate the bowl clockwise one-third (120 degrees) and repeat the lift and fold. Wait a few more seconds, rotate bowl again one-third, and repeat lifting and folding. This is one turn.
Bulk Fermentation (4 hours)
- This is the first rise for your bread, and it will take 3 to 4 hours if your kitchen is relatively warm (78-82°F / 25-28°C). In a cooler kitchen, it will take at least 4 hours, maybe longer.
- Every 30 minutes for 3 to 4 hours, do one turn of the bread. During the bulk fermentation, you want your dough to "bulk up" (aerate), so don’t knead the dough as you turn it.
- Dough will increase in volume noticeably after a few hours.
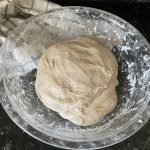
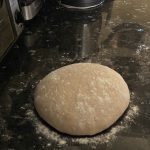
Pre-shape Dough
- Dust a flat, wide work surface with flour (with tea ball or fine mesh strainer) and pour the dough out onto the floured surface. Dough should come out as one cohesive mass, but you may need to scrape the last bits out with a spatula.
- Fold the dough back onto itself, and flip it over so the seam is down.
- Tuck the bottom under to shape it into a ball, building tension in the outer layer as you shape it. Use your bench scraper or your hands to tuck the dough under into itself as you move "around" the dough.
- Sprinkle the top of the dough lightly with flour and cover with a kitchen towel.
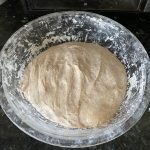
Bench Rest and Final shaping (30 minutes)
- Let dough rest on your work surface for 30 minutes. It will relax into a fat pancake shape.
- If dough looks flat, do a second shaping and a second bench rest to develop tension in the surface.
- Flip the dough over so the seam is up.
- Gently stretch the dough out so that it resembles a thick pizza crust (about 12 inches round). Do not tear or overwork dough! Then, pick one side with your thumb and forefinger, stretch it away from the center of dough, and fold it back into the center. Repeat with the opposite side. Repeat, going around the dough until you have created a dumpling-like shape, while creating tension on the bottom (which is the top of the loaf).Pinch the seams together until they form a smooth(er) ball. Flour the top (which is now the seam side or bottom of the dough).
- Let your dough rest for a minute.
- If you use a proofing basket/banneton, flour the inside generously so dough doesn’t stick. If you use a bowl, line the inside with a kitchen towel and then flour the towel generously.
- Gently pick up your dough and set it into the basket/bowl. The seam side should be facing up.
- Flour the seam. Cover bowl or basket with a dish or tea towel.
Final Rise/Proofing
Same Day (2-4 hours)
- Let the dough rise in your kitchen for 2-4 hours (if your kitchen is relatively warm (78-82°F/25-28°C); if it's cooler than that, extend the time. The shorter the final rise time, the milder your loaf will taste. The longer, the more sour it will taste.
Overnight Slow Proof (8-16 hours)
- You can extend the final rise by putting your dough in the fridge overnight for 8-16 hours. (This will also allow a more pronounced sour flavor to develop, and it lets you bake fresh bread first thing in the morning!)
Bake (1 hour)
- Place a heavy covered Dutch oven or bread baker in the oven and preheat to 500°F / 260°C. Set the rack low enough in the oven so you can remove just the lid to the Dutch oven without having to remove the whole thing.
- Remove bowl with dough from fridge if you did an overnight rise (no need to let it come to room temperature first).
- Gently invert it onto a piece of parchment paper so the seam side is down.
- Once oven is hot, carefully uncover the Dutch oven.
- Dust the bottom of the dutch oven or bread baker with flour (not needed if using parchment).
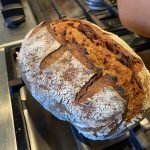
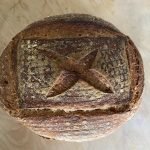
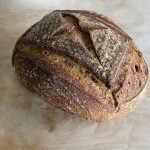
- Score the top of the dough with a serrated knife or bread lame.
- Carefully place the dough into the hot oven.
- Cover the dutch oven and slide it back in the oven.
- Turn the oven temperature down to 450°F / 232°C.
- Bake covered (with Dutch oven lid on) for 20 minutes.
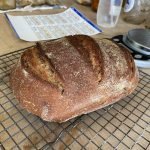
- Remove the lid from the dutch oven/bread baker and bake for an additional 18 to 22 minutes until the loaf is golden brown. To test for doneness, thump the bottom of the loaf. If it sounds and feels hollow all the way through, it is done. If it sounds or feels "wet" or solid, bake it a few more minutes and check again.
- Remove bread from oven and dutch oven, and let cool on baking rack at least 90 minutes.
- Consume within 2 days, or slice, then store in airtight bag and freeze bread. Keeps in freezer for several months.


![Sourdough Bread Master Class [Gift Voucher]](https://fermentersclub.com/wp-content/uploads/2021/05/sourdough-patch-actual-300x300.png)

Author and founder of Fermenters Club. I’ve been fermenting food for 16 years.
In 2024, I published my first book, Fearless Fermenting.
When not stuffing things into jars, I enjoy permaculture gardening, cooking, yoga, writing, and studying cosmology and esoteric traditions.

I guess the heat would kill the probiotics, wouldn’t it? My DIL never thinks my sourdough is tangy enough and this might help, so I still may try. It’ll also be interesting to see what it does to the texture.
Can you use yogurt whey as all or part of the water?
We’ve never tried that, but sounds interesting. Just curious as to why you want to do that? Whey does contain protein and probiotics, so it could modify the culture and most likely the flavor. Give it a go and let us know!