
You’ve never made homemade fermented dill pickles? They’re simple and sublime!
Be warned: once you have, you’ll never buy pickles from the grocery store again. And if you’re a certain a pickle-hawking stork, you might want to start updating your resume…
Think all pickles are fermented? Think again– and know the difference!
Once you have the basics down, you can infinitely vary the basic pickle recipe, with spices and/or other veggies! Here’s one for pickled green beans, and another for beet ‘n’ sour pickles (sweet like bread & butters).


Garlic Dill Cucumbers
Ingredients
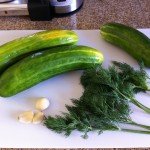
- 3 lbs. (1½ kg) Kirby pickling cucumbers or slicing cucumbers work too
- 4-8 cloves garlic
- 6 sprigs fresh dill leaves or dill flower head
- 1 Tbsp. (15ml) whole peppercorns (any variety, black, white, or mixed)
- 1 large grape or fig leaf
- 1 quart /liter filtered water
- 3 Tbsp. (45 ml) fine sea salt
Optional
- 2 Tbsp. (30ml) pickle brine, sauerkraut brine, or liquid whey
- 6 inch fresh horseradish root
Instructions
Prepare
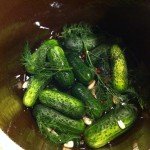
- Rinse off any dirt from cucumbers and scrape off the flower end of the cucumbers to ensure there are no flowering parts (enzymes & molds can make pickles mushy). If using slicing cukes, slice into ¾″ thick pieces. Leave whole if using pickling (Kirby) variety.
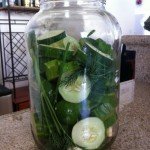
- Use two wide-mouth quart/liter sized jars, or a clean half-gallon or larger glass jar or ceramic crock. Add 2 garlic cloves, peppercorns and two dill sprigs or evenly divide among jars.
- Add half of the cucumbers. Pack them as tightly as you can.
- Crush 1 garlic clove and a few more dill sprigs to the jar.
- If using, wash and peel horseradish and slice into 1" pieces.
- Add grape or fig leaf to jar.
- Add remaining cucumbers, garlic cloves, horseradish and last few dill sprigs.
- Mix Brine: Add salt into filtered water. Stir until salt dissolves.
- If using, add pickle brine or whey from a previous batch to container.
- Place a lid or plate that is slightly smaller than the diameter of the container on top of cukes. Add a weight like a jar or wine bottle filled with water. OR, If using a small batch fermentation kit, add the weight(s) to the jar.
- Slowly pour brine into jar until there’s enough to cover the contents.
- Cover container with a tea towel or clean dishcloth to keep dust and flies out, and secure with twist ties or a rubber band. OR if using small batch fermentation kit, apply the fermentation lid per the instructions.
Ferment
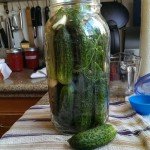
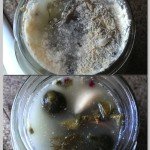
- Place in a cool, dark spot in your house. Taste after 5 days. If it still tastes "raw", let it ferment a few more days.
- White yeasts and mold may form on the surface that is exposed to air. THIS IS NORMAL. Remove weight and lid, wipe or spoon out as much of the mold as you can, clean lid and weight with warm soapy water, dry thoroughly and add back to the jar.
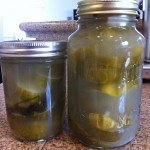
- When you like the taste and texture, transfer to refrigerator and place a tight lid on container. Pickles will last up to 6 months in the fridge.
What I use for Small Batch Fermentation (in mason jars)
Usually I like to make batches of one to 3 gallons. However I also find it handy to ferment in wide mouth mason jars.
A few years ago I made a comprehensive review video series of various small batch fermentation devices. These all fit on a wide mouth mason jar, a popular style that comes in sizes ranging from one pint to a half-gallon. We resell small batch airlock products in our shop:
-
Sale!
![Masontops® Acacia Packer & Airlocks Combo Set [WIDE MOUTH]](data:image/svg+xml;base64,PHN2ZyB4bWxucz0iaHR0cDovL3d3dy53My5vcmcvMjAwMC9zdmciIHdpZHRoPSIzMDAiIGhlaWdodD0iMzAwIiB2aWV3Qm94PSIwIDAgMzAwIDMwMCI+PHJlY3Qgd2lkdGg9IjEwMCUiIGhlaWdodD0iMTAwJSIgc3R5bGU9ImZpbGw6I2NmZDRkYjtmaWxsLW9wYWNpdHk6IDAuMTsiLz48L3N2Zz4=)
Masontops® Acacia Packer & Airlocks Combo Set [WIDE MOUTH]
Original price was: $43.98.$39.95Current price is: $39.95. Add to cart -
Sale!
Masontops® Glass Fermentation Weights [WIDE MOUTH]
Price range: $23.99 through $45.99 Select options This product has multiple variants. The options may be chosen on the product page -
Sale!
Masontops® Glass Weights & Airlocks Combo Set [WIDE MOUTH]
Original price was: $43.98.$39.95Current price is: $39.95. Add to cart -
Sale!
Masontops® Glass Weights [WIDE MOUTH] & Packer Combo Set
Original price was: $44.00.$39.95Current price is: $39.95. Add to cart
![Masontops® Acacia Packer & Airlocks Combo Set [WIDE MOUTH]](https://fermentersclub.com/wp-content/uploads/2023/08/pipe-plus-packer-300x300.png)
![Masontops® Glass Fermentation Weights [WIDE MOUTH]](https://fermentersclub.com/wp-content/uploads/2016/02/widemouth-pebble-box-300x300.png)
![Masontops® Glass Weights & Airlocks Combo Set [WIDE MOUTH]](https://fermentersclub.com/wp-content/uploads/2016/05/pebbles-plus-pipes-300x300.png)
![Masontops® Glass Weights [WIDE MOUTH] & Packer Combo Set](https://fermentersclub.com/wp-content/uploads/2017/02/pebbles-plus-packer-300x300.png)
Author and founder of Fermenters Club. I’ve been fermenting food for 16 years.
In 2024, I published my first book, Fearless Fermenting.
When not stuffing things into jars, I enjoy permaculture gardening, cooking, yoga, writing, and studying cosmology and esoteric traditions.

Pingback: Garlic Dill Sauerkraut – Fermenters Club
Wondering what the grape or fig leaf adds….
Those leaves contain tannins– molecules that are astringent (pucker-y) in flavor and which support the cell walls of fruits as they ferment. Their presence tends to offsets any mushiness and keep the pickles crispy.
I made an amazing batch of dill pickles using your recipe. I want to point out a note that the garlic turned blue. I thought it may be a useful tidbit to add the reasonings behind blue garlic and that it is a sign of a correct acid level in your batch. Blue Garlic = no botulism.
What has happened to the real old time taste of real dill? I used to plant dill weed in my 20’s and have not successfully planted any since, recently tried again (in my 70’s) and it taste like a different mild tasting herb, with no dill flavor…….any ideas ?
Thanks for sharing! Hmm,I can only speculate what accounts for the different taste of dill from 50 years ago. Perhaps the cultivars are different or have evolved, or maybe the soil composition has changed? We are (re-) learning how much of an impact a healthy soil has had on the success (and flavor) of plants.
Love the website! Just a note, that if you put a grape leaf or horseradish leaf in with the pickles, they will stay nice and crisp.