
Here we explore one of the simplest (and most fun) ferments– sourdough. Carbohydrate-hungry microbes in the air are drawn to this simple slurry of flour and water. Each micro-climate (from which wild sourdoughs are made) is said to offer a distinct flavor which can be tasted in the finished product. And boy, what a variety of products– bread, pizza dough, pancakes, biscuits, and more!
In years past, starter was the main leavening agent in home cooking, and starter was often used multiple times a day. In today’s busy world, we may only bake with it once or twice a week.
In my experience, I started a new starter right before New Year’s eve. It took until about January 10 (14 days) to become as active as I wanted it to be before using it to make bread. Part of the reason was because room temperature is a little cooler in the wintertime.
If it’s too cool in your house (below 68°F/20°C), you should put your starter somewhere warmer than room temp– on top of a refrigerator, for example. I love using a multi-tasking seedling mat like this one. It makes a simple incubator which increases temperatures by a few degrees.


Once your starter is established, put it to work making sourdough bread!
To Make a New Starter From Scratch
Sourdough Starter
Equipment
- digital kitchen scale
Ingredients
- 400 grams (14 oz.) organic all-purpose flour
- 100 grams (3.5 oz.) organic whole wheat flour (any variety wheat, or rye)
- filtered water
Instructions
Day 1
- Place a clean quart-sized container like a glass bowl or a mason jar on a digital kitchen scale, and tare the weight (set it to zero).
- Add 100 grams whole wheat flour and 100 ml (equals 100 grams) warm (80°F/27°C) water to container. Stir until no dry flour can be seen.
- Cover top with a breathable cloth or paper towel, and secure with the metal ring or a rubber band. Place in a location where the temperature is at least 70°F/21°C.
Day 2
- Pour out all except 100 grams (about ½ cup) of starter. You'll remove 100 grams or about ½ cup). You can keep a separate larger container for this “discarded” starter, which can be used for many other baking purposes.
- Add 100 grams all-purpose flour and 100 ml warm water to the starter. Stir well until no dry flour can be seen. Store in its warm spot again for 24 hours.
Days 3 to ? (7 to 21 days)
- Discard all except 100 grams of the starter.
- Add 100 grams all purpose flour and 100 ml water to the starter. Stir well.
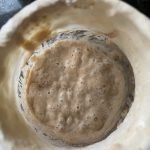
- By the third day, your starter should start to be bubbly and smell slightly sour. Keep going with daily feedings (repeating steps 1 & 2) until starter is vigorously bubbling and smells yeasty.
- When a starter is consistently doubling in volume within six to eight hours after a feeding, it is healthy and has a well-established culture. Note that this may take a few more days or even a few weeks.
Many experts believe that it takes between 30-90 days for a new sourdough to reach its maturity, when fed and used daily.
Storing & Maintaining Active Starter in Refrigerator
It is practical for most of us (who don’t bake every day) to store our starter in the refrigerator. This is perfectly fine. You should feed your starter weekly when it’s “chilling” in the refrigerator.
For the weekly starter feeding:
Discard all starter except about 100 grams (a little under 4 ounces or 1/2 cup). I use a separate half-gallon or larger container to store discarded starter (which is useful for other recipes besides baking bread).
This step is important in order that there be enough food for the yeasts to multiply. If you don’t reduce the population by “culling the herd”, then there will be too many yeast cells for the amount of new food added, and the starter won’t develop properly.
Let the starter come back to room temperature for about two hours, and then feed it 100g AP flour and 100g warm water. Stir until smooth and return to refrigerator.
When a starter is consistently doubling in volume within six hours of each feeding, it is healthy and has a well-established culture.
Using Refrigerated Starter to Bake (Reactivating it)
When you want to bake bread with an active starter that’s refrigerated, you’ll need to plan ahead to feed and reactivate it so it is ready to use for baking. It’s a good idea to revive the starter at night if you will start mixing dough first thing in the morning.
- Remove starter jar from the refrigerator.
- Discard all starter except 100 grams (a little under 4 ounces or 1/2 cup).
- Feed it (100g flour and 100g warm water) and let it sit for 8 hours until it becomes active (and doubles in size).
- Then use the amount you need for your recipe, and again discard all but 100 grams. Store jar back in refrigerator.
If a clear or brownish liquid forms on the top of your starter in the refrigerator (called “hooch”, it’s mostly alcohol, a byproduct of yeast fermentation), simply pour off the excess liquid. The starter should be fine.
Want to just buy some San Diego Sourdough Starter instead?

Author and founder of Fermenters Club. I’ve been fermenting food for 16 years.
In 2024, I published my first book, Fearless Fermenting.
When not stuffing things into jars, I enjoy permaculture gardening, cooking, yoga, writing, and studying cosmology and esoteric traditions.

Didn’t think of that. I suppose that when the starter is fed, then the lid is tightly closed, the yeast uses the oxygen as needed, then when the oxygen level lowers, the bacteria take over to give it the classic sour flavor. Once the starter doubles in size, I put it in the fridge and all yeast/bacteria activity slows down.
I have a San Francisco sourdough starter that has been continuously maintained since 1847 (it may be the 1847 Oregon Trail starter that was brought over to San Francisco in the early days). When I received my starter, it tasted similar to locally created starter. A friend of mine, who was educated in the culture and use of starters and wines at UC Davis, said that the original yeast was still there but was overwhelmed by the local yeast. He suggested going thru a multi-day feeding period, but keeping the lid on my starter jar closed between feedings rather than open to the elements. That way, the local airborne yeast would be cut off from the starter and the 1847 yeast would slowly crowd out the local yeast. I tried it and within a week or two, the starter had taken on that unique flavor and tang of San Francisco Sourdough. Now, I always keep the jar sealed between feedings to make sure that I continue to have real San Francisco starter.
I would suggest that anyone who has received a sourdough starter that has been maintained for decades or even generations try this procedure, and the starter will gradually return to the original flavors from the region of creation.
Very cool story. I also wonder if the anaerobic bacteria (who create lactic acid and other sour flavors) also gain a foothold when you reduce the oxygen (which the yeasts need to respire) and if that accounts for a noticeably more sour flavor.
Thanks for sharing that tip!