
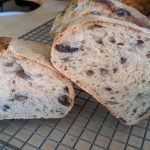
I find the mini loaf (500g or just over 1 lb.) to be a great bread choice in many cases. Whether you’re trying out a new recipe, baking to give away loaves as gifts, or just want a more convenient size to slice and store, the mini loaf is a good option!
Everything is half the size of our standard 2 lb./1kg artisan bread recipe. Start there for lots of tips and tricks.
Mini loaves also bake in about 30 minutes total (instead of 40). And, you can use loaf pans (I use two inverted on each other) as a “Dutch oven” for baking.
Some of my favorite flavors are cinnamon raisin, and more recently, olive-rosemary.


Sourdough Bread (Mini Loaf)
Equipment
- 1 large heavy mixing bowl
- 1 heavy dutch oven with lid OR clay bread baker OR two equal size loaf pans
- bench or dough scraper
- digital kitchen scale
- serrated bread knife
Ingredients
- 175 grams plus 13 grams warmed water 80°F/27°C
- 50 grams active sourdough starter
- 250 grams flour total, comprising
- - 175 grams all-purpose flour
- - 75 grams whole wheat flour spelt, or bread flour
- 5 grams salt
Flavor: Olive Rosemary
- 45 grams olives after pitting (70 g whole), any style
- 2 tsp. (10 ml) fresh rosemary leaves, about one 6" sprig
Instructions
Activate Starter (8 hours)
- Start with 50g of starter. You can use discarded starter for other purposes.
- Mix in 50 grams of 78°F/26°C water and 50 grams all-purpose flour.
- Mix thoroughly and make sure there aren’t any dry bits of flour.
- Cover mixture with a towel or paper towel and let it rise overnight or about 8 hours.
Mix Dough (40 minutes)
- In a large heavy bowl, add 175 grams of 80°F/27°C water and 50 grams of active starter.
- Add the flours and mix thoroughly until the dough looks shaggy and there aren’t any dry bits of flour.
- Let the dough rest for 30 minutes.
Add mix-ins
- Remove pits from olives and chop roughly.
- Dice rosemary leaves.
- At the end of the resting period, dough should look less shaggy and smoother.
- Add 5 grams salt and 13 grams of 80°F/27°C water. Use your hands to mix it and make sure the salt is worked through all of it. Add half the olives and rosemary. Mix thoroughly, then add the other half of salt and mix-ins.
- Once the water and salt are mixed in and the dough feels more cohesive, do two turns (see next step).
- To do one turn, take the side of the dough furthest away ("12:00" of the bowl), and gently lift it out of the bowl until it stretches, then fold it back on itself towards you ("6:00" of the bowl). Wait 10 seconds. Turn the bowl one-third (about 120 degrees) and repeat the lift and fold. Wait 10 seconds, turn bowl one-third and repeat lifting and folding. This is one turn.
Bulk Fermentation (4 hours)
- This is the first fermentation for your bread, and it will take 3 to 4 hours if your kitchen is relatively warm (78-82°F/25-28°C). In a cooler kitchen, it will take at least 4 hours, maybe longer. Leave the dough in its bowl and cover it with a kitchen towel.
- Every 30 minutes for about 4 hours, do one turn of the bread. During the bulk fermentation, you want your dough to aerate, so don’t push all the bubbles out as you turn.
- The dough will increase in volume noticeably after a few hours.
Pre-shape Dough
- Flour your work surface and flip the dough out onto the floured surface (a rounded dough scraper works well for this).
- Fold the dough onto itself, and flip it over so the newly formed seam is down.
- Tuck the bottom under to shape it into a ball, and build tension in the outer layer as you shape it. Use your bench scraper or your hands to tuck the dough into itself as you go "around" the ball.
- Sprinkle the top of the dough lightly with flour and cover with a kitchen towel.
Bench rest and Final shaping (30 minutes)
- Let dough rest on your work surface for 20-30 minutes. It will relax into a fat pancake shape.
- If it looks too runny, do a second shaping and a second bench rest to develop tension in the surface.
- To final shape, flip the dough over so the seam is facing up.
- Do one final and gentle turn of the dough before shaping it again: Instead of three folds, you will do four. If your dough is a clock, take the 12:00 side and gently stretch it up and fold toward you, towards 6:00.
- Do the same with the 3:00 (from 3 to 9) and then from 9:00 to 3:00.
- Take the 6:00 side and fold it over the other folds; as you fold it away from you, keep turning the dough so it flips over seam-side down.
- Let your dough rest for a minute.
- If you are using a proofing basket/banneton for your proofing, flour the inside generously so dough doesn’t stick. If you use a bowl, line the inside with a kitchen towel and then flour the towel generously.
- Gently pick up your dough and flip it over into the basket/bowl so the seam is facing up.
- Flour the seam.
Final Rise (Proofing)
Same Day (2-4 hours)
- Let the dough rise in your kitchen for 2-4 hours (if your kitchen is relatively warm (78-82°F/25-28°C); if it's cooler than that, extend the time. The shorter the final rise time, the milder your loaf will taste. The longer, the more sour it will taste.
Overnight Slow Rise (8-12 hours)
- You can extend the final rise by putting your dough in the fridge overnight for 8-16 hours. (This is also handy to let the sour flavor develop, and it lets you bake fresh bread first thing in the morning!)
Bake (1 hour)
- Place a heavy covered dutch oven or bread baker in the oven and preheat to 500°F/260°C.
- Remove bowl with dough from fridge if you did an overnight rise (no need to let it come to room temp first).
- Gently invert it onto a piece of parchment paper so the seam side is down.
- Once oven is hot, carefully slide the rack out and uncover the dutch oven.
- Dust the bottom of the dutch oven or bread baker with flour (not needed if using parchment).
- Score the top of the dough with a serrated knife or bread lame.
- Carefully place the dough into the hot oven.
- Cover the dutch oven and slide it back in the oven.
- Turn the oven temperature down to 450°F/232°C.
- Bake covered for 15 minutes.
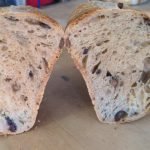
- Remove the lid from the dutch oven/bread baker and bake for an additional 13 to 15 minutes until the loaf is golden brown. Thump the bottom of the loaf. If it sounds hollow all the way through, it is done. If it sounds "wet" or solid, bake a few more minutes and check again.
- Remove bread from oven and dutch oven, and let cool on baking rack for at least 90 minutes.
Looking for a ready-made sourdough starter? We got that!

Ready to learn more? Take one of our classes!
Now available, a self-paced Sourdough Bread Master Class from Fermenters Ciub Academy!


Author and founder of Fermenters Club. I’ve been fermenting food for 16 years.
In 2024, I published my first book, Fearless Fermenting.
When not stuffing things into jars, I enjoy permaculture gardening, cooking, yoga, writing, and studying cosmology and esoteric traditions.
