
After attempting to make cheese once in the fridge with marginal results, and having eaten some amazing salami while traveling last summer, I decided to make a curing chamber at home. My goal is to build a single multi-tasking box where I could control the temperature and humidity and create ideal environments to make various products such as salami, cheese, tempeh, koji, and even kimchi.
There is a wealth of resources out on the interwebs to avail yourself of (here’s a really good one), but I still want to share my particular build and experiences with mine.
The Box
 You’ll need a chamber in which you can control temperature and humidity. The box will ideally be large enough to hold several hanging things at once, contain racks, and also allow for small appliances such as a humidifier, dehumidifier, or heat source. I found a thermoelectric wine refrigerator (as opposed to a more common compressor-based) that holds 48 bottles. (It’s always easy to find good used fridges cheaply on sites/apps like craigslist, OfferUp, etc.) The seller was getting rid of it because it was too big for their space. $50. Deal! Small dorm fridges or even full-sized ones would work too if you have the room. This one has multiple metal racks (highly configurable and simple to keep clean), a manual dial control (which I would override anyway; more on that later); a light bulb with a toggle switch, a dark interior and smooth, easy-to-clean surfaces (i.e. not overly grooved or molded).
I make copious use of wire shelving, and almost everything in my fermentarium is a wire shelving rack that’s on wheels. I wanted to keep the chamber way up off the floor, for cleanliness sake, and also to make it easier to access. So I managed to fit the box perfectly inside a 24 inch wide rack system. Now, it is a bit “front-heavy”, that is, the glass door is by far the heaviest part of the box, so if you’re going to build something like this, make sure you have enough counterweight low and towards the back end to keep it from tipping over.
The Brains
Regardless of what you’d like to make in the chamber, chances are you’ll need to manage and monitor both temperature and humidity during the curing period, which could be anywhere from several days to several weeks or longer.

Unless you’re an avid tinkerer/frequent Radio Shack customer (is that even still a thing?!), I recommend buying an all-in-one controller that manages both temperature and humidity.
I’ll save you some time and effort: Get the Inkbird ITC-608T Temperature & Humidity Controller. Everything comes is in one handy package. It measures both, comes with two kinds of probes, and offers an easy to use programmable interface. $70. Deal!


I mounted the controller above the box, closer to the hinge side of the box (to keep the probe wires out of the way), and attached it to the rack with zip ties, for easy access and visibility. Then I ran both probe wires (one for temperature and one for humidity) from the bottom directly into the box through the front door. This works well, as the rubber gasket around the door easily molds around and is not obstructed by the thin wires. You could get fancy with mounting the wires inside the box; I have been lazy and just set them on top of the top rack for now.
Managing Temperature

To create a cold chamber, you would simply plug the refrigerator into the controller, and let it regulate how much it would need to run to keep the desired temp. I set the refrigerator’s own control to maximum cooling. That way, it will most likely always kick on when the controller does.
To create an incubating (heating) chamber for applications like yogurt, koji or tempeh), leave the fridge unplugged (from the wall and controller), and instead plug a heat source into the controller. For me, a clamp light/lamp with a 60 watt (it was too hot, melting the inside of the fridge!) 40 watt incandescent bulb does a fine job of heating the space. Since light can affect various microbial ferments adversely, I just turn the bulb to face downward, away from whatever I’m incubating. It still generates enough heat to keep the chamber within the right temperature. If you can find another compact small heat source, feel free to improvise.
Managing Humidity

A similar principle as temperature applies here. That is, you may need either or both a humidifier and dehumidifier to keep the relative humidity (RH) for your application within the desired range. Interestingly, at my house here in southern California which has a fairly dry Mediterranean climate most of the year, I have not needed either device yet, at least not for curing meats (which need to be in the 60 to 80% RH range). I tested placing containers of varying sizes filled with water and then tracking the RH. I found that keeping about 1L of water in a wide, shallow pan at the bottom of the chamber works great. As the controller will tell you with fantastic accuracy, the RH does vary within that range, straying outside it occasionally, usually at times during or right after when the fridge runs. For the most part, it does well with no second appliance. PRO TIP: Add 33% salt to the water pan to keep mold from forming.
I noticed that the more items I added to the box at one time, the higher the RH grows, all else being equal. So I wound up switching to a smaller water pan after adding 2 more loins. This shouldn’t be a surprise, since I added a lot more humidity to the system (i.e. the moisture content in the meat we are attempting to dry!) You may need to tweak your system a bit until you stay within the right range for humidity.
Keepin’ it Clean

Sanitary conditions are a necessity in this environment, in which we are (a) potentially dealing with meat and the remote but real possibility of botulism toxin formation, and (b) purposely creating a moist environment in which we are, in most cases, trying to grow fungi or molds.
I use a combination of two natural cleaners. One bottle contains a 1:1 vinegar/water solution with about 1 teaspoon (5 ml) of baking soda, and the other contains 3% hydrogen peroxide (which you can now buy with built-in spray nozzles!) This combination provides an extremely effective and natural antimicrobial one-two punch. [source] Clean all inside surfaces of the box between curing– top, bottom, sides, back, inside the door, and the gaskets, too. I remove the racks and wash them separately with hot soapy water, and then let them drip dry.
Ferment All the Things

This particular refrigerator normally operates at temps from 42 to 66°F (5.5 to 19°C), so it would not be ideal as a kimchi refrigerator, which simulates the near-freezing (32 to 35°F or 0 to 2°C) temperatures of buried earthen pots during a Korean winter in order to maximize kimchi fermentation. But it still could be used for many other applications. As of now, I am using it to learn the art of charcuterie. I came across a wonderful freely published book by Rey, aka @home.charcuterie. You can download a copy of this amazing e-book for yourself at his website, Home Charcuterie Master.

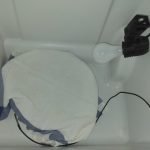
Here, I am using the chamber to incubate koji, the inoculated grain that’s used to make wonderful things like miso.
This summer, when it was too hot inside to make kefir properly, I used the chamber to keep it cool, and this resulted in a perfectly thick texture and great, balanced flavor!
I will also be exploring aged cheeses, tempeh and more in the chamber. Stay tuned!
Alternate Boxes
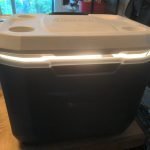
You can use the controller and probes in any container. Recently, when I was using my refrigerator for, well, keeping stuff cold, I used a cooler instead, to make natto. I simply hung a lamp fixture and clamped it to the lip of the cooler, placed the probes inside, and closed it (not fully, as I needed some air circulation).

Recap
- Thermoelectric wine fridge (used): $50
- Temp & Humidity Controller (new): $70
- Clamp lamp and bulb: $12
- Humidifier (only if needed): $20
- Dehumidifier (only if needed): $40
Author and founder of Fermenters Club. I’ve been fermenting food for 16 years.
In 2024, I published my first book, Fearless Fermenting.
When not stuffing things into jars, I enjoy permaculture gardening, cooking, yoga, writing, and studying cosmology and esoteric traditions.

Hi , I live in Florida and I want to cure suppressatta , what kind of fridge would you recommend.
I’d say one like the wine fridge in the article would be a good option for curing sausages like sopressata. You may not need to add a humidifier due to the moist climate in Florida (but you might need a dehumidifier depending on your application.
Question: Do you think it would be okay to incubate my salumi for 12 hours in my THC plant growing room with any harmfull effects to the plants or the Salami?
Thanks,
Jim