
Cauliflower takes well to kimchi! Bite size and firm, yet it is pleasantly softened by the fermentation process.
I leave it to pre-soak longer than other vegetables (8 hours or overnight would be fine, too) because it’s firmer than most veggies and needs a little more time to soften.
If you have make-ahead kimchi paste on hand, this goes even faster!
Fish sauce is optional, but adds a unique traditional umami flavor!


Cauliflower Kimchi
Ingredients
- 1.5 lbs. (700g) cauliflower
- 1.5 quarts /liters filtered water
- 5 Tablespoons 75ml or 75g fine sea salt
- 4 oz (120ml) "Make-ahead" kimchi paste or remaining paste ingredients below see separate recipe for paste
Paste Ingredients
- 2 scallions green onions
- 15 g garlic peeled
- 10 g ginger
- 2 Tbsp. (30 ml) by volume /1 ounce by weight 15g red pepper powder
- 2 tsp. (10ml) soy sauce or tamari gluten free soy sauce
Optional
- 1 tsp. fish sauce
Instructions
Mix Brine & Pre-Soak
- Dissolve sea salt into water, making a 5% by weight brine.
- Rinse cauliflower of any visible dirt.
- Cut florets into about 1 inch/2cm size chunks. Slice the base into smaller pieces than florets, because they are denser.
- Add pieces to a container large enough to hold brine. Add a weight on top. Slowly pour brine until it covers veggies. Soak in brine for 8 hours, or up to 24 hours.
Make Paste
- Peel garlic and clean any dirt off ginger. Chop both roughly.
- Cut stems off scallions, and slice them (white and green parts) into 1/2 inch (1 cm) pieces.
- Add ginger, garlic, and scallions to work bowl of a food processor, along with red pepper powder and tamari.
- Start the food processor, and mix together until a thick paste forms and it "rolls" together when the machine is running. You may need to scrape down the sides of the bowl once or twice. You may adjust with a splash of tamari or soaking brine to get the right texture.
Pack and Ferment
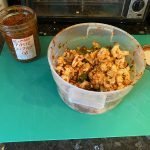
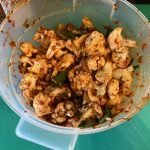
- Drain cauliflower from brine, reserving 1/2 cup (200 ml) of brine.
- Wearing gloves to protect hands from being burned by hot pepper, coat the pieces with paste.
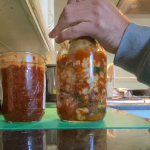
- Pack pieces into a wide-mouth quart-sized or larger glass jar or crock, leaving at least an inch or so from the top rim of the jar.
- Add remaining paste to jar/crock.
- There should be enough brine to completely cover the contents when weighed down.
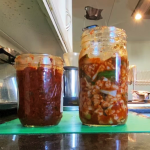
- Apply small-batch fermentation tools (add weight and secure jar with airlock).
- If not using fermentation tools, add a weight on top of the veggies which will keep the contents beneath the brine.The goal is to keep veggies submerged under brine during fermentation.
- Cover container with a swatch of cloth (not cheesecloth), a dish towel or tea towel to keep flies and dust out. Secure with a twist tie, elastic strap or rubber band. If using mason jar, you can secure the cloth with the metal ring.
- Initially, there may not be enough brine to cover entire contents. Check after 1 day. Add reserved brine as needed to completely cover the contents.
- Ferment for 14 days.
- Remove weight and lids and transfer to a jar with a tightly closing lid. Store in refrigerator. Enjoy within 1-2 months.
Author and founder of Fermenters Club. I’ve been fermenting food for 14 years.
In 2024, I published my first book, Fearless Fermenting.
When not stuffing things into jars, I enjoy permaculture gardening, cooking, yoga, writing, and studying cosmology and esoteric traditions.
What is the best place to leave this ferment? is it 14 days room temperature? In the fridge?
Great question. Ferment at room temperature! Vegetable fermentation happens best at room temperature, anywhere from 55F to 80F (above that temp, it will work but there’s a risk of it molding more quickly). When it’s finished and to your liking, then move it to the refrigerator!